

With Party in the Back #4 releasing soon, along with reprints of the other Party in the Back puzzles, I thought I'd dive into the work it takes to create these puzzles! Besides being expensive and difficult puzzles to physically produce, the design process on these is a lot of work!
Picking the Perfect Art
The first stage of design work is spending countless hours browsing classic art that it is the public domain. Many museums post high resolution images of their collections. There's a handy list of good collections here:
https://www.apollo-magazine.com/open-access-image-libraries-a-handy-list
I'm mainly looking for:
1) Art I personally like! If I don't like it, I'm not motivated to work on it.
2) Art that has a fairly clear foreground, mid-ground, and background; ideally 4 or 5 layers worth. I also try to avoid lots of sky, grass, etc, where the puzzing can be a tad boring. These are few and far between! I probably look through at 1,000 images just to find one that I consider as a candidate.
Dissecting the Art
While that first step is time consuming, but not necessarily difficult, now the real work begins!
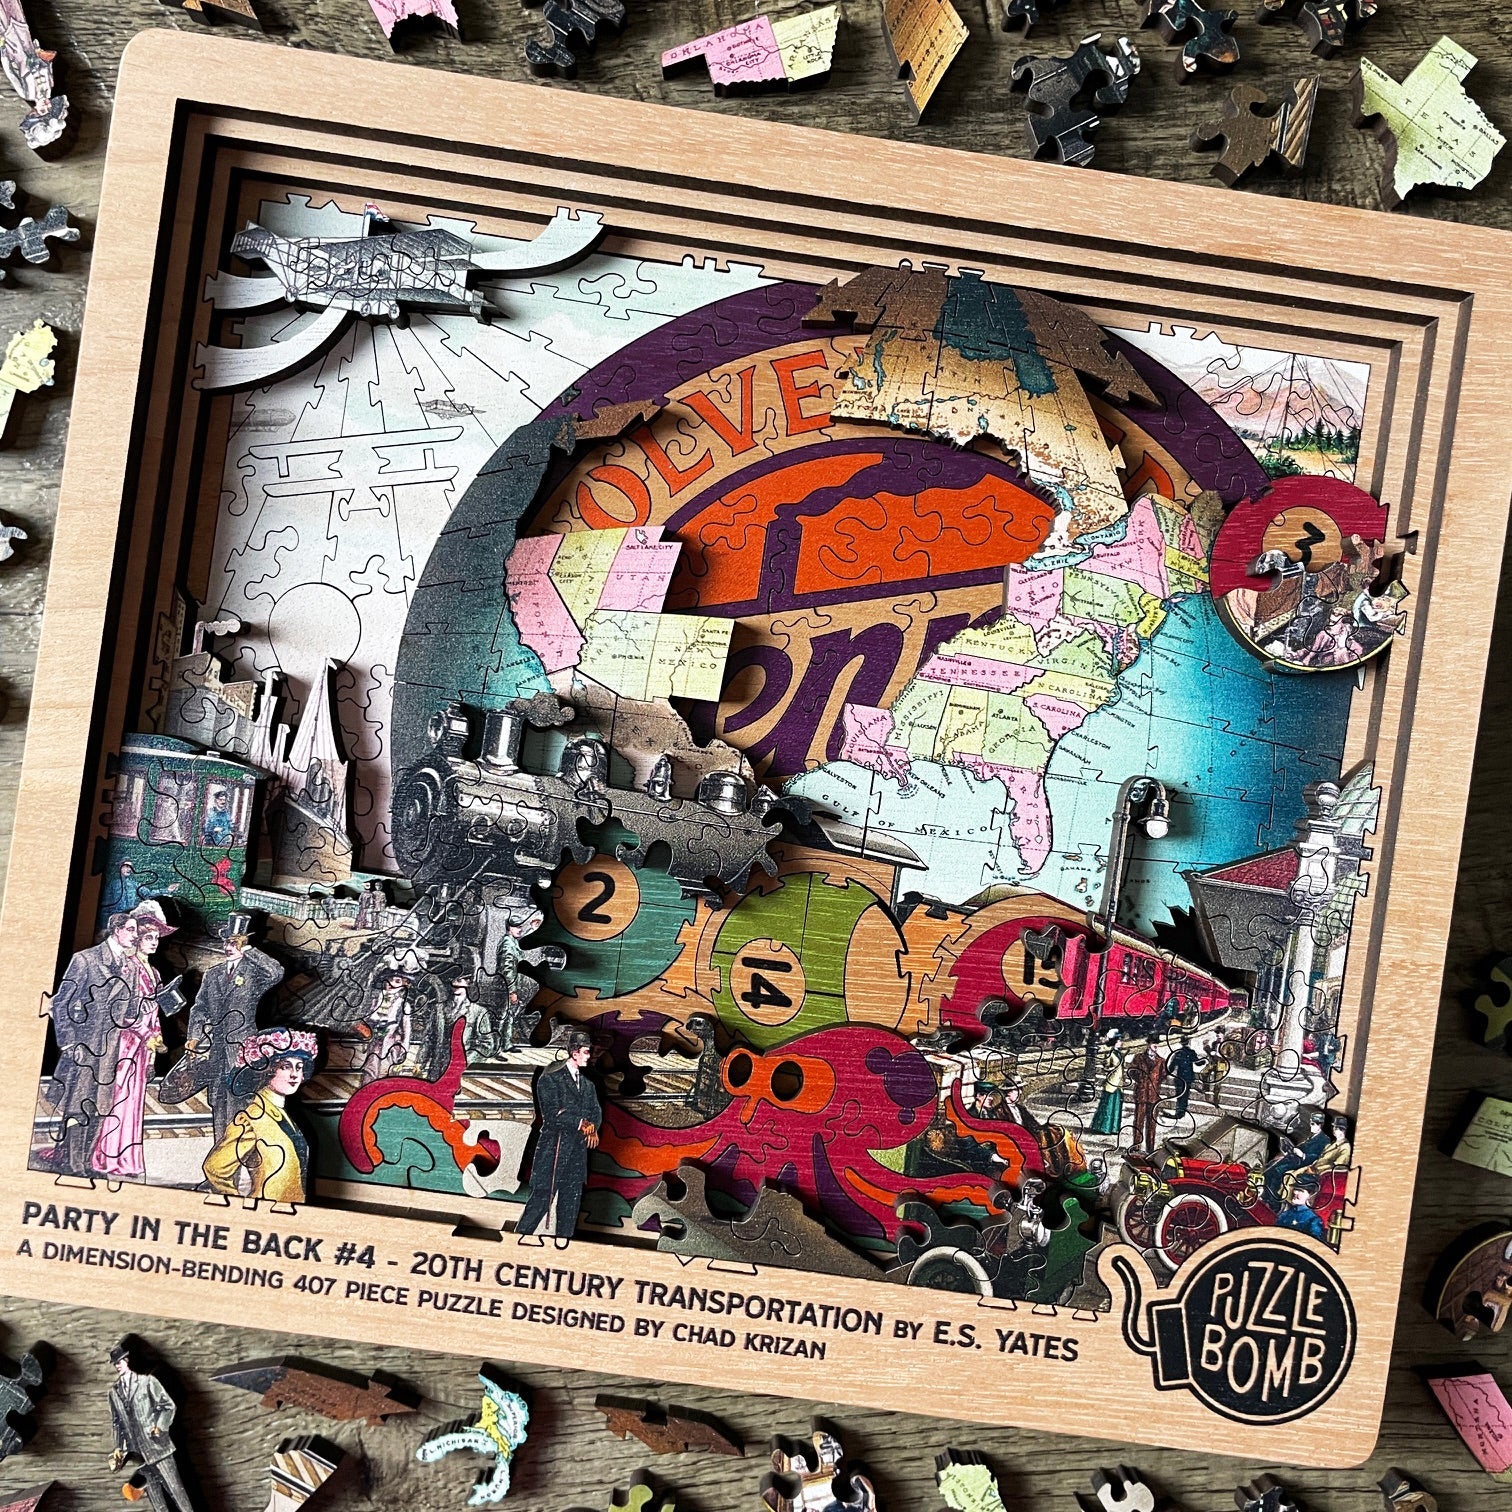
I first take the original file, and isolate the imagery into layers. I then compile all of those isolations into a master file for the puzzle. For example, here is the original art for 20th Century Transportation:
For this blog, we'll just focus one one layer of development, but keep in mind, for a 4 layer puzzle, I need to repeat this process times four. After a lot of work in Photoshop, here's the output I'm after:
There are a few crucial elements here:
1) The grid lines around the edges. This is because each layer needs to gradually be larger than the layer below it, allowing for the edge connections that lock each layer into place in the frame. So, the lowest layer of the puzzle is smallest area, removing a significant amount of original art from the area lost around the edges, while the top layer is the full extent of the original illustration.
This makes the layout surprisingly difficult, as the removal of the outer edges of the art as I work down the layers of the puzzle can result in odd cut-offs, meaning I try to scale the art to avoid any weird issues. The first time I designed one of these, my brain was having such a hard time, I literally stopped to pray that the Lord would help me envision it correctly! :D He helps with so many things in life!
2) The full color art is the area of this layer that will be exposed when the puzzle is complete.
3) The solid purple color is the area of this layer that will be completely removed, revealing the layer beneath it. It's helpful for me to remove the art from these areas when working, so I don't get confused as to what the layer contains. If you look at the original image, you can see this whole purple area will reveal the sky from the layer beneath it.
4) The black area is my safe zone for any Bumfuzzled-style creative work I do on this layer. It will be completely covered by the layer above it. Note that I don't need to completely fill this black area with my own work; it's just a guide for the area my own work needs to stay within.
Side note: Doing this for Party in the Back #1 was a tremendously difficult process, trying to keep track of the tangle of bicycle frames! Difficulty-to-design-wise, I started this series on insane mode!
Time to Sketch!
With this highly technical work done, it's time to get creative!
For the Bumfuzzled-style work, I decided I loved the thought of tying that isolated circular section on the top-right with all the design on the bottom area. I tried to think of round objects that you might find in a scattered grouping, and billiard balls floated to the top as a fun, visually interesting, colorful solution!
I also thought it would be fun if each billiard ball didn't have any solid internal connections, but was rather connected by the area around the balls. It's a tricky section of puzzle that forces you to think a bit differently! I did end up adding little "bumps" to the numbered circles, just so the proper rotation of those pieces wasn't frustrating.
For the final art areas, since a full map of the US is depicted, I couldn't pass up the opportunity for a push-fit map. I love push-fit puzzles, so this was a great opportunity. This was made possible due to the outline of the entire globe serving as a frame to hold the push-fit section together. I just had to make sure the globe was all solidly connected around it.
Most of the states, other than California and Texas, were too small to do individually, so I just doodled the map into sections, strictly following the state boundaries, forming new regions such as Wisciowa and South Wyota, and the ever-popular Florgiabama.
And-speaking of weird cut-offs from earlier, I had to figure out how to gracefully connect that airplane in the upper-left to the frame. For such a small part of the puzzle, I took an embarrassing number of cracks at it before I was happy with that little section!
The Final Layer
After digitally tracing my sketch, and lots more boring-to-see file layout for final production, the sample arrives many months later. Here's this layer in all it's glory!
Now, Do It Three More Times!
There's a reason I'll probably only release one of these per year, if that, as they're a huge undertaking. The good news is, as I work my way up the layers, the amount of work on each layer becomes less and less due to the top layers covering less area than the bottom layers. For this reason, I usually start with the bottom layer and work my way up, as it's a bit of a relief as the design time decreases throughout the process.
In this case, the bottom two layers were both a tremendous amount of work, while the top two being far less. Each Party in the Back is different in that regard, depending on how much area each layer covers.
Here are the other layers of this puzzle, the first being below the layer we've been discussing, and the other two layers above it.


Worth It!
Some of the most difficult things are often the most worthwhile, and that's definitely the case here. Holding that final design sample in my hands, the hours upon hours of work are all worthwhile; much less when I start seeing folks enjoying the fruit of this labor!
I dare say the result is one of the most wild and unique wooden puzzling experiences out there.
In his wildest dreams, I bet Mr. E.S. Yates wouldn't have imagined in his wildest dreams his art would be turned into these puzzles all these years later. I'd like to think he'd be pretty tickled by it if he were around today!
Preorders will start on October 1st, offering some nice early bird pricing! Here's that project if you'd like to follow:
https://gamefound.com/en/projects/puzzle-bomb/the-grand-return-of-party-in-the-back-with-three-new-bumfuzzled-companions
Love and blessings,
Chad
0 comments